One of the most challenging montage or masking jobs in the profession of post-production editing is the hair lift. When the model has long flowing hair and the subject needs to change location many post-production artists call in sick. Get it wrong and, just like a bad wig, it shows. Extract filters, Magic Erasers and Tragic Extractors don’t even get us close.  Portrait image by Dan Stainsby The first secret step must be completed before you even press the shutter on the camera. Your number one essential step for success is to first shoot your model against a white backdrop, sufficiently illuminated so that it is captured as white rather than gray. This important aspect of the initial image capture ensures that the resulting hair transplant is seamless and undetectable. The post-production is the easy bit - simply apply the correct sequence of editing steps and the magic is all yours. This is not brain surgery but follow these simple steps and you will join the elite ranks of Photoshop gurus around the world. Celebrity status is just a few clicks away.
 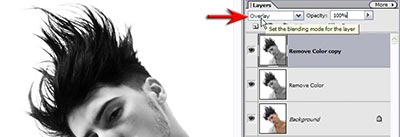 Step 1 The initial steps of this tutorial are concerned with creating a mask that can be used in the final montage. Start by dragging the background layer to the New Layer icon to duplicate it. Choose ‘Remove Color’ from the Adjust Color submenu found in the Enhance menu (Enhance > Adjust Color > Remove Color). Drag this desaturated/monochrome layer to the New Layer icon in the Layers palette to duplicate it. Set the blend mode of this new layer (now on top of the layers stack) to ‘Overlay’ mode.
 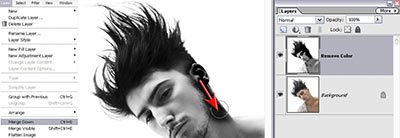 Step 2 From the Layer menu choose ‘Merge Down’ to create a single high-contrast monochrome layer. Select ‘Black’ as the foreground color and the ‘Brush tool’ from the Tools palette. Choose a large hard edged brush and 100% opacity from the Options bar and set the mode to ‘Overlay’ (also in the Options bar). Painting in Overlay mode will preserve the white background and darken the rest of the pixels. Accuracy whilst painting in Overlay mode is not a concern when the background is white or is significantly lighter than the subject. Avoid going anywhere near the tips of the hair at this stage.
 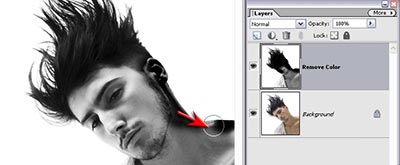 Step 3 Even the bright tones of the white shirt can be rendered black by repeatedly clicking the mouse whilst using a large brush in Overlay mode. Again it is important to avoid going anywhere near the hair.
 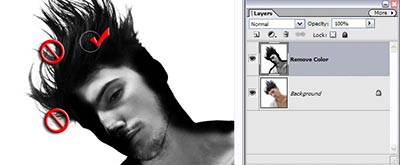 Step 4Darken the body of the hair near the scalp but avoid the locks of hair that have white background showing through. Painting these individual strands of hair will thicken the hair and may lead to subsequent halos appearing later in the montage process.
 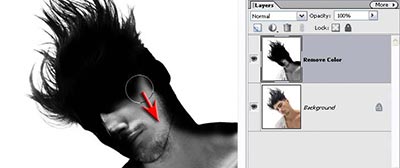 Performance Tip Switch the blend mode of the brush in the Options bar to ‘Normal’ mode when painting away from the edge of the subject. This will ensure a speedy conclusion to the mask making process. The mask is now ready to use in the montage. Note > If any of the background has been darkened in the process of creating a black and white mask switch the foreground color to ‘White’ and choose ‘Overlay’ in the Options bar. Paint to render any areas of gray background white. It is again important to avoid painting near the edges containing delicate hair detail.
 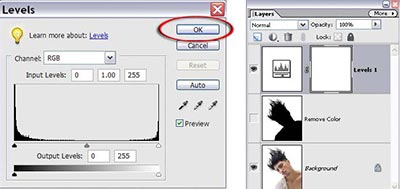 Step 5With the Remove Color layer selected add a Levels adjustment layer. Without making any adjustment simply select OK. This Levels adjustment layer has a layer mask that we can use to house the mask that we have created in the previous step.
 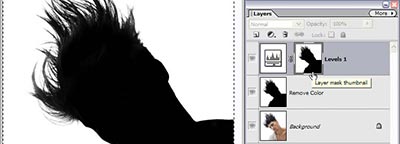 Step 6The next step relocates the mask you have just created into the layer mask of the adjustment layer. From the Select menu choose ‘All’ and from the Edit menu choose ‘Copy Merged’. Hold down the Alt key and click on the layer mask thumbnail in the Layers palette. The image window will momentarily appear white as you view the empty contents of the layer mask. From the Edit menu choose ‘Paste’ to transfer the contents of the clipboard to this layer mask. Click on the layer below to select it and then click on the Visibility icon of this layer to switch it off. This mask layer serves no purpose now that it has been successfully transferred to the adjustment layer mask.
 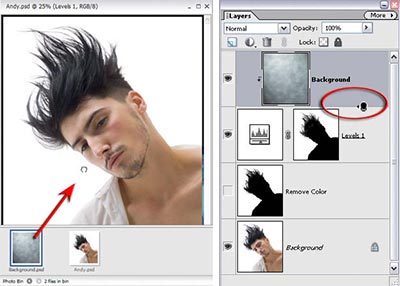 Step 7The new background is placed on its own layer above the figure and mask layers. Drag the thumbnail of this new file into the image window of your project file from either the Photo Bin or the layer thumbnail in the Layers palette. Group this new background layer with the adjustment layer beneath (Layer > Group with Previous). Alternatively you can hold down the Alt key and click on the dividing line between the two layers to group them.
 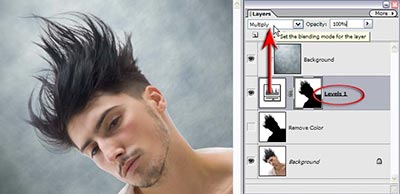 Step 8Grouping the new background with the adjustment layer will mask the background in the region of the figure but the quality will not yet be acceptable. Setting the blend mode of the adjustment layer to ‘Multiply’ will bring back all of the fine detail in the hair. The background will be not darkened by applying the ‘Multiply’ blend mode as white is a neutral color. The subtle detail in the fine strands of hair will however be preserved in all their glory.
 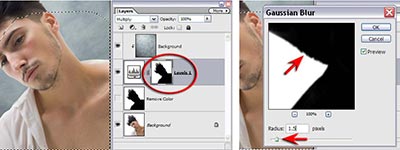 Step 9The accuracy and quality of the edge of the mask will usually require some attention in order for the subject to achieve a seamless quality with the new background. Make a selection of all of the edges that do not include any hair detail using the Lasso tool with a small amount of feather set in the Options bar. With the adjustment layer mask selected choose the ‘Gaussian Blur filter’ (Filter > Blur > Gaussian Blur) and apply a 1- to 2-pixel Radius Blur to the mask. Click OK and then from the Enhance menu choose a Levels adjustment from the Adjust lighting submenu. Move the central Gamma slider underneath the histogram to realign the edge of the mask with the subject edge (no dark or light halo should be visible).
 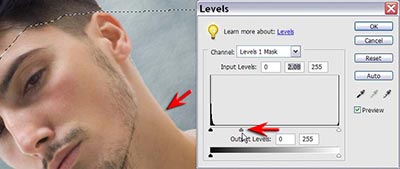 Performance Tip If the mask is too soft the edges can be sharpened by moving the black and white sliders in towards the central Gamma slider a little. Select OK when perfect alignment has been achieved. Zoom in to 100% Actual pixels whilst working to accurately assess the quality of your mask.
 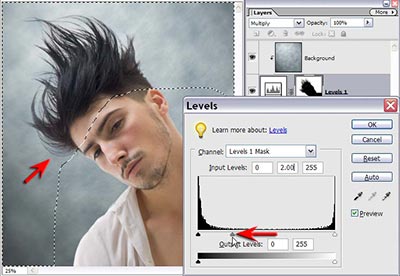 Step 10In most instances the hair is already looking pretty fabulous but to modify and perfect the hair even further you will need to inverse the selection (Select > Inverse). Choose ‘Levels’ once again and move the central Gamma slider to the left to increase the density of the hair and eliminate any white halos that may be present. Moving the White slider to the left a little may help the process of achieving a perfect blend between subject and background. Select OK and choose ‘Deselect’ from the Select menu. Performance Tip Any localized refinement of the mask can be achieved manually by painting with a small soft edged brush directly into the layer mask. Paint with white at a reduced opacity (10-20%) to remove any fine halos present in localized areas. Several brush strokes will slowly erase the halo from the image.
 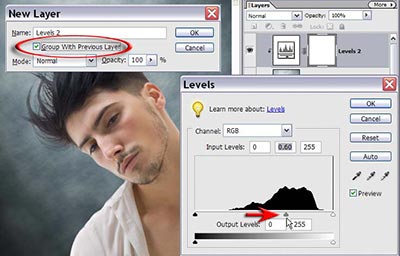 Step 11The true test of an accurate mask for a subject that was photographed against a white background is when you place the subject against a very dark background. Grouping a Levels adjustment layer with the new background layer can darken the background image used in this project. Hold down the Alt key when you select a Levels adjustment layer from the Layers palette. Click on the Group with Previous box in the New Layer dialog box and then select OK to open the Levels dialog box. Move the Gamma slider to the right in order to preview your subject against a darker background in the image window.
Selecting & Extracting Hair - Masking Tutorial - Extraction Tips
Posted by natali at 9:34 AM


0 Comments:
Post a Comment